| Metropower Portal | ||
| ||
 Rover 25 etc mirrors Rover 25 etc mirrorsModerators: Jump to page : 1 Now viewing page 1 [25 messages per page] | |
| Technical Area-> Styling | Message format |
| Jin |
| ||
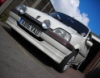
| Regular Posts: 159   | Since completing the door hinge mod and window frame adjustments http://midasownersclub.co.uk/forums/viewtopic.php?f=14&t=2178&start=50 I needed to do something about the mirrors, the base they mounted onto was in poor shape and there was now an odd looking spacer on the driver’s side to correct he door miss-match that needed hiding. I opted to remedy the situation by making some custom mirror mounts as I did with the quantum but rather than use aftermarket units such as the vitaloni I used before I wanted to try to utilise some OE ones for better quality, I always like the rover 25 / 45 /75 / lotus / Noble M12 units and they seemed to fit the bill for the Midas perfectly since if rover had continued production of the 100 for any longer they would have ended up on those and be branded a “facelift model” so off I went to find some  Stripped down  I chose electric because the glass clicks into place by pushing the glass and they only really need adjusting once, I didn’t fancy trying to feed wires through my housing and the manual adjustment ones flap all over the place with the control rods removed. I started by cutting x2 10mm thick aluminium bases, the mirrors will bolt through these,  with the end face bevelled to put them at the correct angle for the door incline I drilled and tapped the end face to provide a temporary fastening prior to welding, I made some pointed screws to mark out the holes to be drilled into the triangle plate relative to the 10mm thick base  Cut out 2 triangles, one slightly larger to account for the door spacer  Drilled and bolted and then welded into place  I also put an M10 aluminium stud on the rear to line up with the original hole in the door frame triangle to give extra support  With that done it was time for a quick grit blast and a touch of filler  Smoothed  2k primed and guide coat applied, once smoothed down time for a topcoat of 2k pure black tint, the finish didn’t come out too bad      With that hardening off I set about restoring the door triangle frame, long term I will strip them both out the doors and probably powder coat after welding in new reinforcements but for now I really do need windows in the car on a daily basis so that will have to wait, the metal was in a bit of a state     But I did grind the rust out and treat with Vactan which is supposed to be good  I also made 2 blanking caps to seal off the inside totally from water ingress, up until now water leaked in through this gap at the top and soaked into what I can only describe s mouldy donkey fur – no wonder the metal rusted away  To remedy I made 2 plastic blanks from left over grill mounts and bonded them over the hole   Should keep them dry for now, they will get welded once removed. back to the mirors, I normally bond things like this with polyurethane but this time I didn’t for 2 reasons, 1 I intend to remove them in the future to remedy the rust. 2 they may not bod as well due to said rust, so to be safe I used an acrylic based adhesive that although strong is nowhere near as impossible to remove as the polyurethane, even so I filled the whole void behind with it to totally seal out air and moisture, the M10 stud there as a safety precaution to keep them held secure, as it happens I doubt they are going anywhere in a hurry  That now done I had to make a small ally spacer to locate in the mirror hole   And support it on 2 ally washers to get the height right, the spacer is threaded and sits slightly lower than the mirror mount hole so with the top held down with a stainless washer and nut, the stiffness of movement can then be controlled but tightening or whatever.  Although the mirrors look big (everything looks big next to this car) they actually stick out less than the standard units  I then painted the mirror caps in RAL9010 to match my wheels  All fitted up and adjusted and away we go… pleas excuse the state of the car, is used every day rain or shine or rain again         Edited by Jin 7/2/2015 12:17 PM | ||
| MetroGaz |
| ||
| Veteran Posts: 335 Location: York, tis Cold Up North! | Hi Good to see the engineering detailing in this thread and wish I could do metalwork amd weld like that, nevermind the great painting. Great thread, keep up the good work. MG Edited by MetroGaz 7/2/2015 5:49 PM | ||
| Jin |
| ||
| Regular Posts: 159 | Cheers mate. Much appreciated | ||
| Metromartin |
| ||
 MP Admin Posts: 17870    Location: Gloucester | Thats some impressive fabrication! Good work! | ||
| Jump to page : 1 Now viewing page 1 [25 messages per page] |
| Printer friendly version E-mail a link to this thread Jump to forum : |
| (Delete all cookies set by this site) | |
| Running MegaBBS ASP Forum Software v2.0 © 2003 PD9 Software | |
