| Metropower Portal | ||
| ||
 VVC Rally build VVC Rally buildModerators: Jump to page : 1 2 Now viewing page 2 [25 messages per page] | |
| Gallery-> Members' Journals | Message format |
| daz500 |
| ||
| Member Posts: 72  | What are you doing about the clutch pedal for the hydraulic mechanism? | ||
| aquascrotum |
| ||
 Regular Posts: 112  Location: Armagh, Northern Ireland | daz500 - 27/10/2013 10:46 PM What are you doing about the clutch pedal for the hydraulic mechanism? Some say fabricating, some say bodging....its been done before by AdrianSi as far as I know, its on a build thread. If its worked before we'll get it to work again! Will make sure we take plenty of photos when its done as I'd say it will be of interest. (Thanks again for the cage btw). Edited by aquascrotum 27/10/2013 10:55 PM | ||
| daz500 |
| ||
| Member Posts: 72 | If you get a hydraulic pedal working and you want to make another, let me know and I'll buy one off you. | ||
| AdrianSi |
| ||
Expert Posts: 8490    Location: Midlands | aquascrotum - 27/10/2013 10:54 PM daz500 - 27/10/2013 10:46 PM What are you doing about the clutch pedal for the hydraulic mechanism? Some say fabricating, some say bodging....its been done before by AdrianSi as far as I know, its on a build thread. If its worked before we'll get it to work again! Will make sure we take plenty of photos when its done as I'd say it will be of interest. (Thanks again for the cage btw). Definately fabricating  | ||
| Navrallymetro |
| ||
| Member Posts: 71 | I spent tonight working at the clutch. It's a fairly handy job. I used the mg pedal and the only real fabrication required will be shaping the pedal to sit further away from the brake pedal. But I've left that for tomorrow night.  Edited by Navrallymetro 30/10/2013 11:46 PM | ||
| Navrallymetro |
| ||
| Member Posts: 71 | I got the clutch pedal finished tonight. Just needs a lick of paint and I'll get it fitted. Meanwhile my brother (aquascrotum) fitted the mgf rad. Tomorrows plans are to finish fitting the hydraulic handrake, paint the floor and start plumbing the brake lines inside.    | ||
| aquascrotum |
| ||
Regular Posts: 112 Location: Armagh, Northern Ireland | A few evenings last week and a 14 hour shift yesterday means more progress....probably slower than some projects on here given the time spent but tbh we're going to the n'th degree (down to tapping and dieing every bolt that comes off etc).. New aluminium MGF rad went in successfully, just need to fabricate new mounts for the solid top tube and make a longer length of flexible hose from the stuff donated from the F. Used the how-to on here and have it that the bonnet catch closes fine with a couple of mm clearance all round, easy job in the end.  Old sub came out on Fri night which allowed a weekend of footery stuff on the bulkhead and round the engine bay and bonnet. Fished the brakelines through the bulkhead and have the hydraulic handbrake 90% complete using the original pivot so as to comply with road rally / targa event rules. Bit p*ssed off though, as by the time we'd committed to this route we found out that local clubs are using discretion and standard hydraulic handbrakes seperate to the original lever will still pass scrutiny. Also rigged up a thumbscrew to lock the ratchet mechanism which = custom fly-off hand brake... Full floor pan in the footwell slathered in Hammerite too.   Bulkhead, front panel and inner wings in the engine bay all slathered in Hammerite hammered black. We found a worrying amount of rot at the bottom of the front panel including areas a bit too close to the front s/f mounting points, so all cut out, kurusted, patched primed and painted - this was unexpected and fairly set the program back for the weekend. Though I still can't get how badly designed these cars are for rust traps - just makes me worry about what we can't see. Pedal box is now back in including the F clutch pedal and hydraulic clutch master cylinder. Took a bit more work on the internals than anticipated as the return spring fouled the bottom of the drivers side demister vent where it exits the heater matrix - cue some fabricating using some easily melted old gallon jars, copious silicon sealand and some structural insulating tape...seems to work well though. Wouldn't recommend it overall for a road car but if you were in a track car and werent worried about retaining internal trim then it would be easy.   Then new sub went in, including Ralphs tasty PG1 spacers for the Metro drivers side arm and individualisers on the front hydragas cans...major milestone as its the first significant part of MGF meets Metro!   Also found a convenient space for the air horns and compressor on the scuttle in front of the drivers side - possibly pi**ed off a few neighbours "testing". Plan for next week is get the hubs built and get rolling again, loom should be with us shortly so engine and loom could be realistic depending on how we go with head gasket / timing belt work etc. Want to finalise the setup for the top hose on the rad but that should be a short evenings work. Still have serious work to do at the back end rust-wise, cage to fit, and we're testing layouts for switch and fuse panels for spot lamps etc. But definitely getting there! | ||
| Ed Norton |
| ||
 Veteran Posts: 310 Location: nr Evesham Worcs | Looking very good and liking the fast progress . | ||
| aquascrotum |
| ||
Regular Posts: 112 Location: Armagh, Northern Ireland | Another busy weekend - got the garage booked off the da for the week and some days leave coming up so its a sustained attack on the back end. Plan is subframe out, cleaned and prepped, petrol dank dropped to allow us to get rid of the hydragas pipes and re-route the rear brake lines. Then weld the monster holes in the boot floor and get in at the passenger side arch while theres room. Preview of the rust  Sub out, stripped, wirebrushed and hammerited  Tackled the passenger side hole for the weekend-probably the toughest repaid I'd encountered in the car so far. The floor was rotten through and the supporting channel section was rotten back as far as the petrol tank and spare wheel well. Everything cut out.  Reformed the tapered section of flanged channel and welded on.  Re-plated onto the underside of the channel from the floor stiffener section (not pink paint - the MGF bonnet was a grand source of tin for light plating)  Floor plating sorted and welded on and primed. Once the underside is cleaned back, primed, hammerited and waxoyled it should last another while. Just have to repeat on the other side a few evenings this week   Also got the MGF wingmirrors rubbed back and primed and will be wiring the heated mirrors into the heated rear screen circuit. The brother (navrallymetro) has started building a facia for the MGF oil temperature clock out of one of the fan outlets. And we sorted a genuine MOMO wheel and got an MGF boss off fleabay.  | ||
| aquascrotum |
| ||
Regular Posts: 112 Location: Armagh, Northern Ireland | Bit more of an update. We took a couple of days leave last week so as to get all the work finished that needed the rear sub and petrol tank out, because we needed the car back on four wheels to clear out of the garage...turned into 3 14 hour days in a row due to unforeseen rust in the arches. Drivers side floor - replaced the box section, plated the stiffeners and plated the floor.   Passenger side arch - had thrown up a few photos previously of someones last repair job, which seems to have entailed welding in a new "hoop" from front to back in small sections, then welding on about 8 small rectangles from the hoop to the rear quarter, filling the outside with about 8mm of filler, and filling the fecking chasm that used to be where the inner arch attached to the outer with an incredible combination of fibreglass and filler. His welds were rusted through and the parts of the rear quarter he'd welded onto were totally rotten. This isnt a restoration (if it was it would be new panels) so we took what remained of his good metal, cut out the rot, and replated the outter arch from the inner edge. Then made repair panels shaped to plate the inner arch and form the 2nd skin on the arch itself. Not pretty but...   Drivers side arch...I'd previously repaired the rear of this one but when we saw the cut of what was on the passengers side we reckoned we'd better expose the remainder on the d/s, just as well we did. Lots of filler, lots of rust, very little metal. Reformed a new hoop tying into my previous repair at the rear, plated out on the the rear quarter, and repaired the inner.   Everything properly primed this time so hopefully will last a bit longer. First few coats of filler have went on both arches to get the shape up and we're in the middle of putting the fine stuff on at the minute...work in progress (sitting on Dytec 14s)  A momentous occasion was then savoured...the FINAL PATCH...over the inner drivers side quarter where it rots behind the filler neck. At this stage we were genuinely wondering would we need to get another MGF bonnet for tin...  After that we finished re-routing the brakelines under the petrol tank from the hydraulic handbrake, and doubled the kerbweight with primer, seam sealer, hammerite, and nice black hammerite waxoyl underbody paint. The brother's seamsealing skills are admirable, I couldn't have put it on behind the arches thicker with a trowel. Fitted our harness eyebolts and reinforcing plates into the rear seat rail, and finished the boot floor out in hammerite.   And that was that, back on 4 wheels. This weekend the VVC engine and box was split and head removed. Think the clutch will be replaced and due to flush liners we'll not be able to use MLS gaskets but will give a blue bead Payen elastomer a whirl and see how we go, the previous HG didnt seem in particularly bad nick. Plans for this week and HG and oil rail and ancillaries, timing belts, and start reassembly. Few questions...we have an MGF oil temperature gauge that will be going in to the drivers side dash, does this signal have to come from the loom or is it hardwired from the sender beside the oil filter to the gauge itself? | ||
| AdrianSi |
| ||
Expert Posts: 8490 Location: Midlands | The mgf oil temp comes off that second sensor on the oil temp sensor. I nearly left the wire exposed from the loom but to behonest for got about asking you! It's the brown/blue wire but is unfortunately insulated and wrapped up inside the main trunk of the loom. It's literally a single signal wire to the gauge. | ||
| aquascrotum |
| ||
Regular Posts: 112 Location: Armagh, Northern Ireland | Quick pictureless update - thankfully got a productive few days in over Xmas in between bouts of man flu. Since the last update - sorted some Dytec 14s locally which was a bonus. Still pressing on with the TR rims though. New Payen MLS gasket, water pump, cambelt setup, tensioners etc all done. Engine loom on, engine in and drive shafts in, most of the plumbing gubbins complete. Had to remake mounts for the MGF rad and take the corners out of the slam panel so as to push it forward to be able to clear the sensor on the top coolant elbow. Also had to use the F fan as the old Metro one didnt fit - the F one is deeper which also didnt help. Have got about 8mm clearance from the sensor to the fan blade now so happy enough. Got sorted with a Ka UJ for the PG1 gear selectors - hadnt seen it written here on any threads I'd picked up on so worth mentioning for anyone who comes after, the UJ is splined so needed bored out to 14mm. We were going to try to bore the UJ to take the securing split pin for the gear selector, but this would have fouled the clamping bolt on the UJ. Eventually worked it with a bit of slotting that a well fitted bolt through the UJ clamp catches on the notch in the selector rod formed by the hole for the split pin, so all good. Hopefully cutting the Rover 200 gear linkage goes so well!? Rear arches are also filled and primed and have had a few coats of colour - we're currently having difficulty as the lacquer from the previous arch repairs is causing blistering when our new paint hits it, so we're chasing the blistering back up the quarter panel with each attempt. Have no idea what sort of stuff the previous repair used but its a fair ball ache. Am not looking for a concours finish so may well just have to settle with the next attempt and G3 the sh*t out of it to try and get something that looks passable. Tasks for the rest of our week off: Modify the radiator top hose to suit the MGF rad and VVC elbow - am looking at cutting off the kink and brazing the lip back on so as just to leave it straight and have plenty of coolant hose left over from the F to make up whats left. Fit the MEMS 2J ECU - unless we're missing something this needs a custom mount? Car was previously MEMS 1.9, am going to try and fabricate something out of some tin and the MGF bracket so as to sit raised flat between the battery and heater inlet, is this standard enough or is there an off the shelf item out there? Sort the PG1 gear linkage. Fit some new heat shielding to the exhaust tunnel and get the front end sealed up with waxoyl paint. Get the exhaust on (full sportex and de-cat - am not anticipating that we'll like this for long but if nothing else it was cheap and gives us something to drive to the Maniflow garage with...). Start the car! Weld in strengthening plates on the underside for the rollcage feet in the cabin and rear arches - what is everyone else doing with this as the cabin floor isnt flat, my plan is to make flat plates and bolt up to slightly distort the floor pan to suit? Or are others making plates to the shape of the underside and then adding packers on the internal side? Get map lights, tripmeters, Potti lamp, stopwatch, reverse lamp and spotlamps wired in on a new custom loom and dash - probably just going to use a blanking plate across the stereo DIN slot for the time being but longer term I think the plan is to make something OEM looking by putting something in place of the ashtray and hazards switch / 12v socket. We're targetting an MOT and shakedown before a rally entry on 15 February - fingers crossed! Edited by aquascrotum 1/1/2014 11:16 PM | ||
| aquascrotum |
| ||
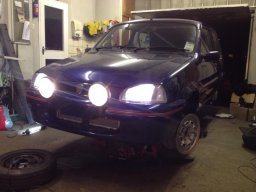
Regular Posts: 112 Location: Armagh, Northern Ireland | Another update with a few photos this time. Good progress made, down to finishing touches and cosmetic stuff as well as rally prep. Engine plumbed in, coolant and radiator finalised, electrics finalised and ECU mounted. Since this photo was taken we've stuck a £7 ebay cone filter on as the Metro one wont fit with the hydraulic clutch slave cylinder. Had to remove the charcoal filter to do this though (question at bottom of post...)  Got the PG1 linkage sorted with minimum hassle without the cat on and felt pretty chuffed, then went back to trial fit the exhaust but it was clashing badly. Turns out I had the cat on upside down (thought the shielded side was heat sheilding  ) so when that went on properly we had a lot less issue. I've got plenty of photos of this process incl. modifying to suit a cheap Ka UJ, if theres any demand for a how-to thread I'll stick it up. End result is we have a seriously slick change, nice small gate too. ) so when that went on properly we had a lot less issue. I've got plenty of photos of this process incl. modifying to suit a cheap Ka UJ, if theres any demand for a how-to thread I'll stick it up. End result is we have a seriously slick change, nice small gate too. Had to make up a small spacer section as the Sportex back and middle was tight to the floor...this is just for MOT, decat to go on when thats over which will take up the slack. Exhaust spacer (bodged from flanges of the old 1.1 exhaust)  Underside finished out  One other interesting bit was the top rail from radiator to the coolant elbow which needed modifying due to the MGF rad. Managed to get a plumber friend to but something together in 1" copper including the bleed offtake to the expansion tank. Worked out a very tidy job (we think so anyway). Top rail - sprayed silver with exhaust paint.  Fair bit of time spent fitting and wiring internal trim - couple of photos of the mostly finished articles. We're keeping carpets, we dont need weight loss that much. Finally got the hydraulic handbrake plumbed in, it used 2 different imperial UNF union sizes for inlet and outlet so took a while sourcing parts. Fitted a navigators footrest, spot lamps wired in and custom mounts fabricated, dash panel put together with switches and fuse panel, and a reverse lamp fitted. A tripmeter and stopwatch on the dash will finish this out. Also put on the 4 points (front pair use seatbelt mounts, rear pair use eyebolts into strengthened captive nuts welded into the rib in the rear floor). Cage is bolted in including stiffener plates front and rear under the car to MSA spec. Will let a few photos do the talking.       Stuff needing done - Have to finish the hydraulic clutch - sourced 6mm cunifer pipe but have been stalled for a couple of days in trying to source an M12 female union to fit onto the flexi hose. Our rev counter on the dash isnt working - where should I be checking for faults first? The clock is also not working in case that means theres a more general problem. Ignition and warning lights etc all working ok though, havent managed to test the speedo itself as the car isnt rolling. The charcoal filter - in removing this I've put a solid bung on the intake to the inlet manifold and a solid bung on the line to/from the petrol tank. Do either of these lines need to be able to breathe? Have tried wiring up the MGF oil temperature gauge but no success so far. The wire comes off the signal wire from the sensor. In terms of the gauge itself, there is a bulb (live and earth, working fine) and three terminals on the gauge marked +, G, and T. Am assuming G is earth and T is Temperature signal? If I connect a live feed to either + or T the gauge maxes out. If I just use the signal wire to T and an earth then theres no reading even when the car is well warmed up. Whats the correct configuration or how do I check if the gauge is bucked? (Adrian!?) This week will be sorting a couple of sets of tyres, doing the clutch, and getting a test run. But significantly, it lives....will post first start and a few revvy videos later. Sportex sounds ridiculous, I couldnt live with day to day but as a rally car its very good fun, definitely will let us know we're on a day out - noise app says it will pass scrutiny so happy days! | ||
| aquascrotum |
| ||
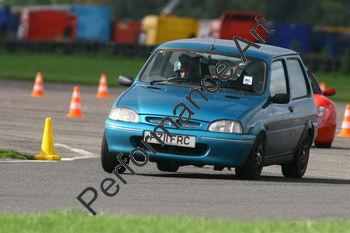
Regular Posts: 112 Location: Armagh, Northern Ireland | Quick update - Car MOT'd OK - got pulled on a nipped rear flexible brake hose but got a re-test the same day. She goes like stink - still running the metro cat on her but the mid and high range lift is great, always wants another gear. The MGF ratios suit us well, slightly long first but with a 2nd and 3rd that just keep pulling from all ranges. We got her as ready as we could for our first event last Saturday, a lanes rally event on probably 50% (very) greasy tarmac / 30% gravel / 20% mud. Am surprised they got the stages cleaned up and half way driveable given the weather conditions, it was still slippy as hell though. Main issue in terms of prep was brakes - initially we couldn't get a useable pedal at all. We isolated the hydraulic handbrake which improved things slightly but still werent getting anything great on the old MGF discs and pads, so got in some new brakes. That got us a decent pedal for MOT - after that we plumbed the handbrake back in but there's just too much give in the twin HB master cylinders for the Metro master to cope with - so we ditched it with the intention of relying on the cable HB, because on first outings it had been fantastic. Anyway we went out for a shakedown on Fri night and came back with a sh*te footbrake and no handbrake left at all. The brother was out until 1pm on the Fri night on the handbrake adjusters and we tore on and hoped for the best. Stuff we didnt get done - any steering geometry set up at all (she's fairly wandery at the front), this is probably significant given I had the track rod ends dismantled for cleaning when the came off the MG and just tightened back on arbitrarily. We probably have a leaking drivers side rear can (individualised). We also put 5mm spacers on the rear knuckles at the hydragas struts (which given a 5:1 ratio should have given 25mm increase in ride height?) - we'd pumped the car to as much as the pump would take previously but it left the car undriveable, the back of the car would take off if you hit a manhole cover, so wanted to achieve an increase in ride height without the high pressures - but this seems to have failed totally, she wont't go up any farther than what we go previously. We also have a sump guard fabricated in competition grade aluminium that will go on some time soon. Anyway photos - we treated the day as a sighter given we had crap brakes, no handbrake, wonky steering geometry...etc....so took it very, very easy given this was our first day out after about 10 months of work and my life wouldnt have been worth living if I'd binned it. Trips set up  Ready to go, brown trousers on  Mid stage (one of the cleaner gravel sections)  Half way point - car intact, definite need for rally flaps (one of the things we didnt get sorted before the event)  Fettling  So anyway - car behaved well and somehow sheer power seems to have got us 3rd in class and 13th overall out of 35 runners (!), which we're more than happy with given how relaxed we took it - theres a lot more to come given we weren't attacking corners and had to back out on the slippy stuff as the rear end just didnt want to follow the rest of the car. Also had to 3-point turn one particular hairpin twice due to the handbrake just giving up, which cost probably 15 seconds. So with some more work we should have a seriously competitive car on our hands, if limited by a lack of driving talent. VVC FTW though, she's a weapon of a car. Delighted overall | ||
| Paul r |
| ||
| Extreme Veteran Posts: 539  Location: Swindon, Wilts | what wheelsare they and what was required for them to fit? are you using GTI/F brakes? | ||
| aquascrotum |
| ||
Regular Posts: 112 Location: Armagh, Northern Ireland | TR7 rims. Fitted with 6mm spacer and some minor grinding to ribs on the inside of the rim, and a few mm taken off the outside of the caliper. Brakes are MGF vented discs and calipers. | ||
| Jump to page : 1 2 Now viewing page 2 [25 messages per page] |
| Printer friendly version E-mail a link to this thread Jump to forum : |
| (Delete all cookies set by this site) | |
| Running MegaBBS ASP Forum Software v2.0 © 2003 PD9 Software | |
